YAWOA YA-201 ODB2 Scanner Car Diagnostic Scan Tool Auto OBDII Engine Fault Code Reader Battery Tester PK CR3001
YAWOA YA-201 ODB2 Scanner Car Diagnostic Scan Tool Auto OBDII Engine Fault Code Reader Battery Tester PK CR3001
€ 29,99
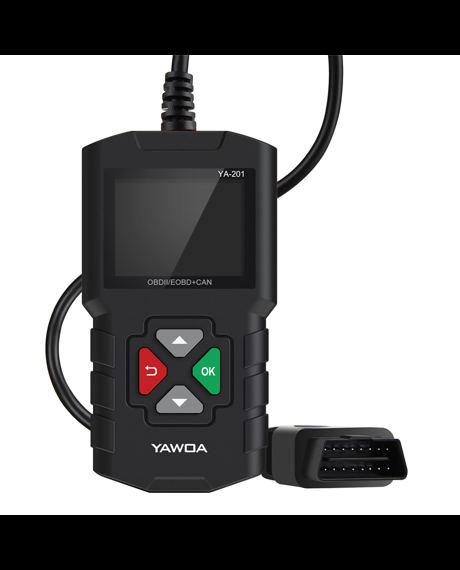
Top 5 Reason to Choose YA201: 1. Free Upgrade Life Time : Just Put in the USB and Paste the files into Flash disk 2. Data stream sorting3. Find The Cause Of The Fault Code4. Support 12V vehicles 1996 &newer (OBDII & CAN)5. YA201 provides full OBDII/EOBD diagnostic functions and meets protocols such as ISO9141-2, ISO14230-4, SAEJ1850, and ISO15765-4.6. Multi-Language: English, French, Russian, Spanish, German, Italian, Portuguese, Japanese, Chinese Specifications:Brand: YAWOAModel: YA-201Product: ODB2 ScannerMaterial: PVC materialScreen: 2.4 inch TFT color screenScreen Resolution: 320*240Connector: OBD2 standard connectorVoltage: 9-16V DCWorking Temperature: -10℃~+40℃SIze: 5.4*2.9*0.9 inchCable Length: 31.5 inchKeys: 4 keys(OK /Back/Up/Down)Weight: 200gNOTE: * To review I/M Readiness status,make sure that the ignition key is switched to ON with the engine off. * Not all monitors are supported by all vehicles.There are two types of l/M Readiness tests: * since DTCs Cleared -shows status of the monitors since the DTCs werelast cleared. * This Drive Cycle-shows status of monitors since the start of the currentdrive cycle. Package Included:1* YA201 ODB2 Scanner1* English User Manual Functions: 1.Diagnostic Functions Use this function to select a vehicle and then proceed to the diagnostic Menu. 2:Read codes Reads DTCs from vehicles computer with Koeo or KOE. 3.Erase Codes Deletes dtcs from vehicle s memory. 4.Live Data Live Data menu lets you view, record and playback real time PIDs data from the electronic control mod. In live data menu, you can insert the selected item to front by holding pressing the "ok" key for 3 seconds. 1)All Datastream: Views vehicle Parameter Identification Data(PIDs)in real time PIDs are displayed in either a text format or graph format when available.2)Graph Display Show the live data via graph mode, selecte PIDs by "OK" key, enter the graph by "Return"key switch the PIDs by "UP"and "Down"key. 3)Record Record the PIDs frame, selecte PIDs by "OK" key,enter the record page by "Return" key. Select the storage slot location to start record. 4)Playback Choose the record slot to playback the live data, switch frame by"UP" and "Down" key. 5.Freeze Frame Displays a snapshot of operating conditions at the time of a fault. 6.Vehicle Info Scan tool displays the vehicle's VIN number, Calibration ID (s) and CVNthat identify the software version in the vehicles control module (s.)The tool also displays In-Use Performance Tracking of importantreadiness monitors. 7.Component Test Tool will display a list of components and their locations on the vehicle.This function will always appear on the Main Menu. This selection will appear on the Diagnostic Menu only when the toollhas a list of component locations for the currently selected vehicle. 8.On-Board Monitoring Scan tool controls the operation of vehicle components, tests or systems. 9.On Sensor Test Displays oxygen sensor monitoring test results from the vehicle's memory,the O2 Monitor Test is NOT an ON-DEMAND TEST. 10.I/M Readiness Displays a snapshot of the state of the vehicle's OBDII Monitors.DTC Look Up Looks up definitions of DTCs stored in scan tool, and shows the possiblecauses of the DTC. (NOt every DTC with possible causes reason) Battery Display battery condition, Max value Min value by graph in real time Option Changes tool option displays tool information, and performs tool self-tests. Languages Allows the user to change the language used by the tool. English is default. Unit Changes measurement units display metric or imperial. Data Logging Turn on /off the data log function to record the device data through vehicle. Self-test Display Test Used to check the display screen. Keyboard Test Verifies that the keys are working correctly.How to use ?Locating Data Link Connector1.Choose a location under driver side dash under steering wheel and use that description in both places.2.If unsure about location of dlc, check vehicl manual or reputable service center about locationConnect the tool:1.If the connector is not there a label should be there indicating the whereabouts of the connector.2:If necessary, remove the cover from the DLC3.Turn the ignition switch to the on position. Do not start the engine4.Plug the OBD connector into the Data Link Connector.5.The tool will attempt to identify the vehicle. If successful, the vehicle identifie lisplayed. if the vehicle cannot be identified, menus will be shown for you to select the vehicle manually.
| Prijs | Verzendkosten | Totaal | |
|---|---|---|---|
€ 29,99 | € 0,00 | € 29,99 |
Alternatieve producten
© 2016 - 2024 aanbiedingchecker